We just shipped Transforms endpoints on the Weld REST API. You can now create, update, publish, and version data models through HTTP requests without touching the UI.
This opens up a few workflows teams have been asking about: deploying models from CI/CD, bulk-importing SQL from other tools, and managing models programmatically from notebooks, orchestrators, or AI agents.
What You Can Do
The Transforms API covers the full lifecycle of a data model:
| Endpoint | What it does |
|---|---|
GET /transforms | List models with filters for status, name, and folder path |
POST /transforms | Create a new model with SQL, materialization type, and optional auto-publish |
GET /transforms/{id} | Retrieve a single model with its dependencies |
PATCH /transforms/{id} | Update SQL, name, folder, materialization, or docs |
DELETE /transforms/{id} | Soft-delete a model and remove its DWH view/table |
POST /transforms/{id}/publish | Materialize the model to your data warehouse |
GET /transforms/{id}/versions | Browse the SQL revision history |
POST /transforms/bulk | Create up to 50 models in one request |
GET /transforms/available_references | List all {{weldTag}} references you can use in SQL |
All endpoints follow the same authentication and pagination patterns as the rest of the Weld Connect API.
End-to-End: From SQL to Published Model
Here's a full walkthrough: authenticate, create a model, and publish it to your warehouse.
1. Authenticate
Use the API key from Settings → API Keys in the x-api-key header:
curl https://connect.weld.app/transforms \
  --header 'x-api-key: YOUR_API_KEY'
2. Discover Available References
Before writing SQL, check which tables and models are available to reference:
curl https://connect.weld.app/transforms/available_references \
  --header 'x-api-key: YOUR_API_KEY'
1{
2  "data": [
3    {
4      "weld_tag": "raw.stripe.payments",
5      "type": "raw_view",
6      "dw_item_id": "stripe_schema.payments"
7    },
8    {
9      "weld_tag": "staging.stripe.stg_payments",
10      "type": "model_view",
11      "dw_item_id": "staging.stg_payments"
12    }
13  ]
14}
Use these weld_tag values inside {{}} in your SQL template.
3. Create a Transform
Create a model using {{weldTag}} references in the SQL. Weld resolves these to the correct warehouse tables automatically.
curl https://connect.weld.app/transforms \
  --request POST \
  --header 'Content-Type: application/json' \
  --header 'x-api-key: YOUR_API_KEY' \
  --data '{
  "name": "monthly_revenue",
  "folder_path": "analytics/finance",
  "sql_template": "SELECT DATE_TRUNC(created_at, MONTH) AS month, SUM(amount) AS revenue FROM {{raw.stripe.payments}} WHERE status = '\''succeeded'\'' GROUP BY 1",
  "materialization": "table",
  "documentation": "Monthly revenue from Stripe payments.",
  "publish": false
}'
The response includes the model's id, resolved parameters, and current status:
1{
2  "id": "OoORhGXUVjsqFG",
3  "name": "monthly_revenue",
4  "folder_path": "analytics/finance",
5  "status": "draft",
6  "materialization": "table",
7  "sql_template": "SELECT DATE_TRUNC(created_at, MONTH) AS month, SUM(amount) AS revenue FROM {{raw.stripe.payments}} WHERE status = 'succeeded' GROUP BY 1",
8  "parameters": [
9    {
10      "weld_tag": "raw.stripe.payments",
11      "type": "raw_view",
12      "dw_item_id": "stripe_schema.payments"
13    }
14  ],
15  "documentation": "Monthly revenue from Stripe payments.",
16  "created_at": "2026-04-20T10:00:00.000Z",
17  "updated_at": "2026-04-20T10:00:00.000Z"
18}
Setting "publish": true would materialize the model to your warehouse immediately. Here we keep it as a draft to review first.
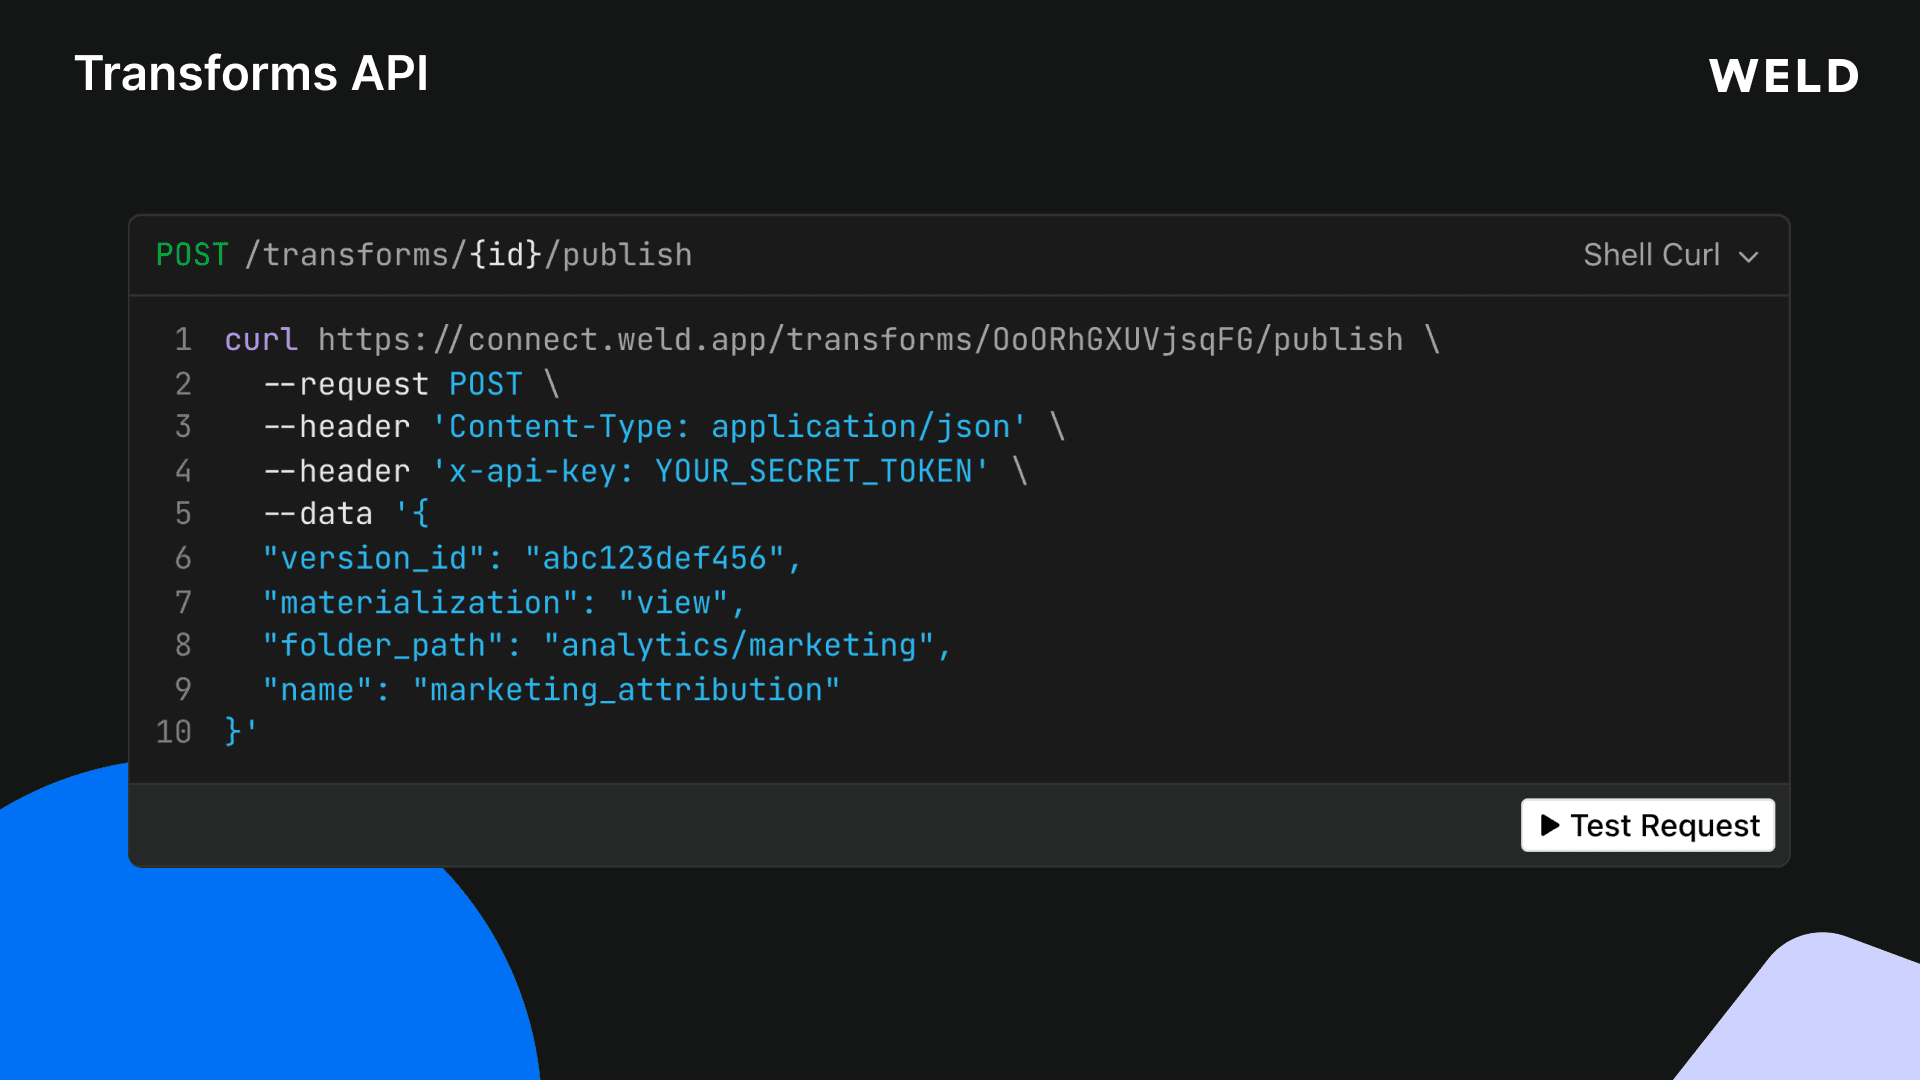
4. Publish to the Warehouse
When the model is ready, publish it:
curl https://connect.weld.app/transforms/OoORhGXUVjsqFG/publish \
  --request POST \
  --header 'Content-Type: application/json' \
  --header 'x-api-key: YOUR_API_KEY' \
  --data '{
  "materialization": "table"
}'
The model is now materialized as a table in your data warehouse. You can override name, folder_path, or materialization at publish time without changing the saved model.
5. Update and Re-Publish
Need to change the SQL? Use PATCH with "publish": true to update and re-publish in one call:
curl https://connect.weld.app/transforms/OoORhGXUVjsqFG \
  --request PATCH \
  --header 'Content-Type: application/json' \
  --header 'x-api-key: YOUR_API_KEY' \
  --data '{
  "sql_template": "SELECT DATE_TRUNC(created_at, MONTH) AS month, SUM(amount) AS revenue, COUNT(*) AS transactions FROM {{raw.stripe.payments}} WHERE status = '\''succeeded'\'' GROUP BY 1",
  "publish": true
}'
Every change creates a new version entry. You can browse the history with GET /transforms/{id}/versions.
Bulk Import Models
Migrating from another tool or bootstrapping a new project? Create up to 50 models in a single request:
curl https://connect.weld.app/transforms/bulk \
  --request POST \
  --header 'Content-Type: application/json' \
  --header 'x-api-key: YOUR_API_KEY' \
  --data '{
  "transforms": [
    {
      "name": "stg_payments",
      "folder_path": "staging/stripe",
      "sql_template": "SELECT id, amount, status, created_at FROM {{raw.stripe.payments}}",
      "materialization": "view"
    },
    {
      "name": "stg_customers",
      "folder_path": "staging/stripe",
      "sql_template": "SELECT id, email, name, created_at FROM {{raw.stripe.customers}}",
      "materialization": "view"
    }
  ]
}'
Each model is processed independently. If one fails, the rest still go through.
Where Transforms Fit in the API
The Transforms endpoints extend the same API you already use for ELT syncs and connections. A typical automated pipeline looks like this:
- Connect a data source via the Connection Bridge endpoints
- Create an ELT sync to land raw data in your warehouse
- Add source streams to select which tables to sync
- Enable the sync to start the schedule
- Create transforms that reference the synced data using
{{weldTag}}syntax - Publish the models to materialize views or tables in your warehouse

All of this can run from a single CI/CD pipeline, a Python script, or an orchestrator like Airflow. No manual steps needed.
Example: CI/CD-Driven Model Deployment
Here's a minimal script that reads SQL files from a models/ directory and deploys them via the API:
#!/bin/bash
API_KEY="your_api_key"
BASE_URL="https://connect.weld.app"

for file in models/*.sql; do
  name=$(basename "$file" .sql)
  sql=$(cat "$file")

  curl "$BASE_URL/transforms" \
    --request POST \
    --header "Content-Type: application/json" \
    --header "x-api-key: $API_KEY" \
    --data "$(jq -n \
      --arg name "$name" \
      --arg sql "$sql" \
      '{name: $name, sql_template: $sql, materialization: "view", publish: true}'
    )"
done
Import & Export Models in the App
Prefer working with files instead of API calls? Weld also has a built-in Model Import & Export feature in the app that complements the API.
Export downloads your published models as a zip archive. You can choose between two formats:
- Weld-native:
.sqlfiles with amanifest.json, ready to re-import into another workspace or keep as a backup. - dbt: a full dbt project with
dbt_project.yml,sources.yml, and Jinja{{ ref() }}/{{ source() }}syntax.
Import lets you upload a zip of .sql files. Weld automatically detects whether the files use Weld-native or dbt syntax, resolves all dependencies, and shows a dry-run preview before applying changes. You can import up to 500 models at once.
This works well alongside the API. You might export models from a staging workspace via the UI, then use the Transforms API to deploy them programmatically in production.
Read the Import & Export docs →
Using the API with CLIs, Agents, and Dev Tools
The Transforms API is a standard REST API, so it works with any tool that can make HTTP requests. Here are some ways teams are using it:
CLI workflows
Write a quick shell script or use tools like httpie or curl to manage models from your terminal. Useful for:
- Deploying models from a local
models/directory as part of amake deployornpm run deployscript - Listing and inspecting models across workspaces without opening the browser
- Quick iteration: edit SQL in your editor, publish with one command, check the result in your warehouse
AI agents and coding assistants
The API is a good fit for agent workflows where AI handles the SQL or orchestration:
- Claude Code, Cursor, or GitHub Copilot agents can call the Transforms API to create and publish models as part of a coding task. Give the agent your API key and endpoint, and it can scaffold a full analytics layer from a prompt.
- Custom GPTs or AI assistants can use the API as a tool/function to let users ask questions like "create a monthly revenue model from Stripe data" and have it deployed automatically.
- Data agents in LangChain, CrewAI, or similar frameworks can use the API as a tool to build, test, and publish models as part of a multi-step data pipeline workflow.
Python and notebook workflows
Use requests or any HTTP library to manage models from Jupyter notebooks or Python scripts:
1import requests
2
3API_KEY = "your_api_key"
4headers = {"x-api-key": API_KEY, "Content-Type": "application/json"}
5
6# Create and publish a model
7resp = requests.post("https://connect.weld.app/transforms", headers=headers, json={
8    "name": "monthly_revenue",
9    "sql_template": "SELECT DATE_TRUNC(created_at, MONTH) AS month, SUM(amount) AS revenue FROM {{raw.stripe.payments}} WHERE status = 'succeeded' GROUP BY 1",
10    "materialization": "table",
11    "publish": True
12})
13print(resp.json())
14
Beyond Transforms: The Full Weld Connect API
The Transforms endpoints are just one part of the Weld Connect API. You can control your entire data stack programmatically:
- Connections: create data sources, configure credentials, and manage connector instances via the Connection endpoints
- ELT Syncs: trigger syncs, select tables/streams, set schedules, and monitor sync status via the ELT Sync endpoints
- Transforms: create, update, publish, and version data models (covered in this post)
- Reverse ETL: push warehouse data back to downstream tools
This means you can build a complete data pipeline end-to-end through the API: set up a connector, start syncing data, transform it with SQL models, and push it back out. All from code.
Explore the full API reference →
Get Started
The Transforms API is available on the Business plan.
Read the Weld Connect documentation →
![Boost Meta conversion tracking to 95%+ with server-side tracking: A step-by-step guide [2026 update] image](/_next/image?url=%2Fblog%2Fboost-facebook-conversion-tracking-to-95-with-server-side-tracking-a-step-by-step-guide%2Fmeta-conversion-api-cover.png&w=3840&q=75)